Default Values.
The file with the default values is found in the base directory : AstroPie.ini
There is one in the installation zip file, best is to inspect and adapt it to your needs just after installation.
Changes to it are done via the dedicated Default Values screen, accessible via the DashBoard (upper right box).
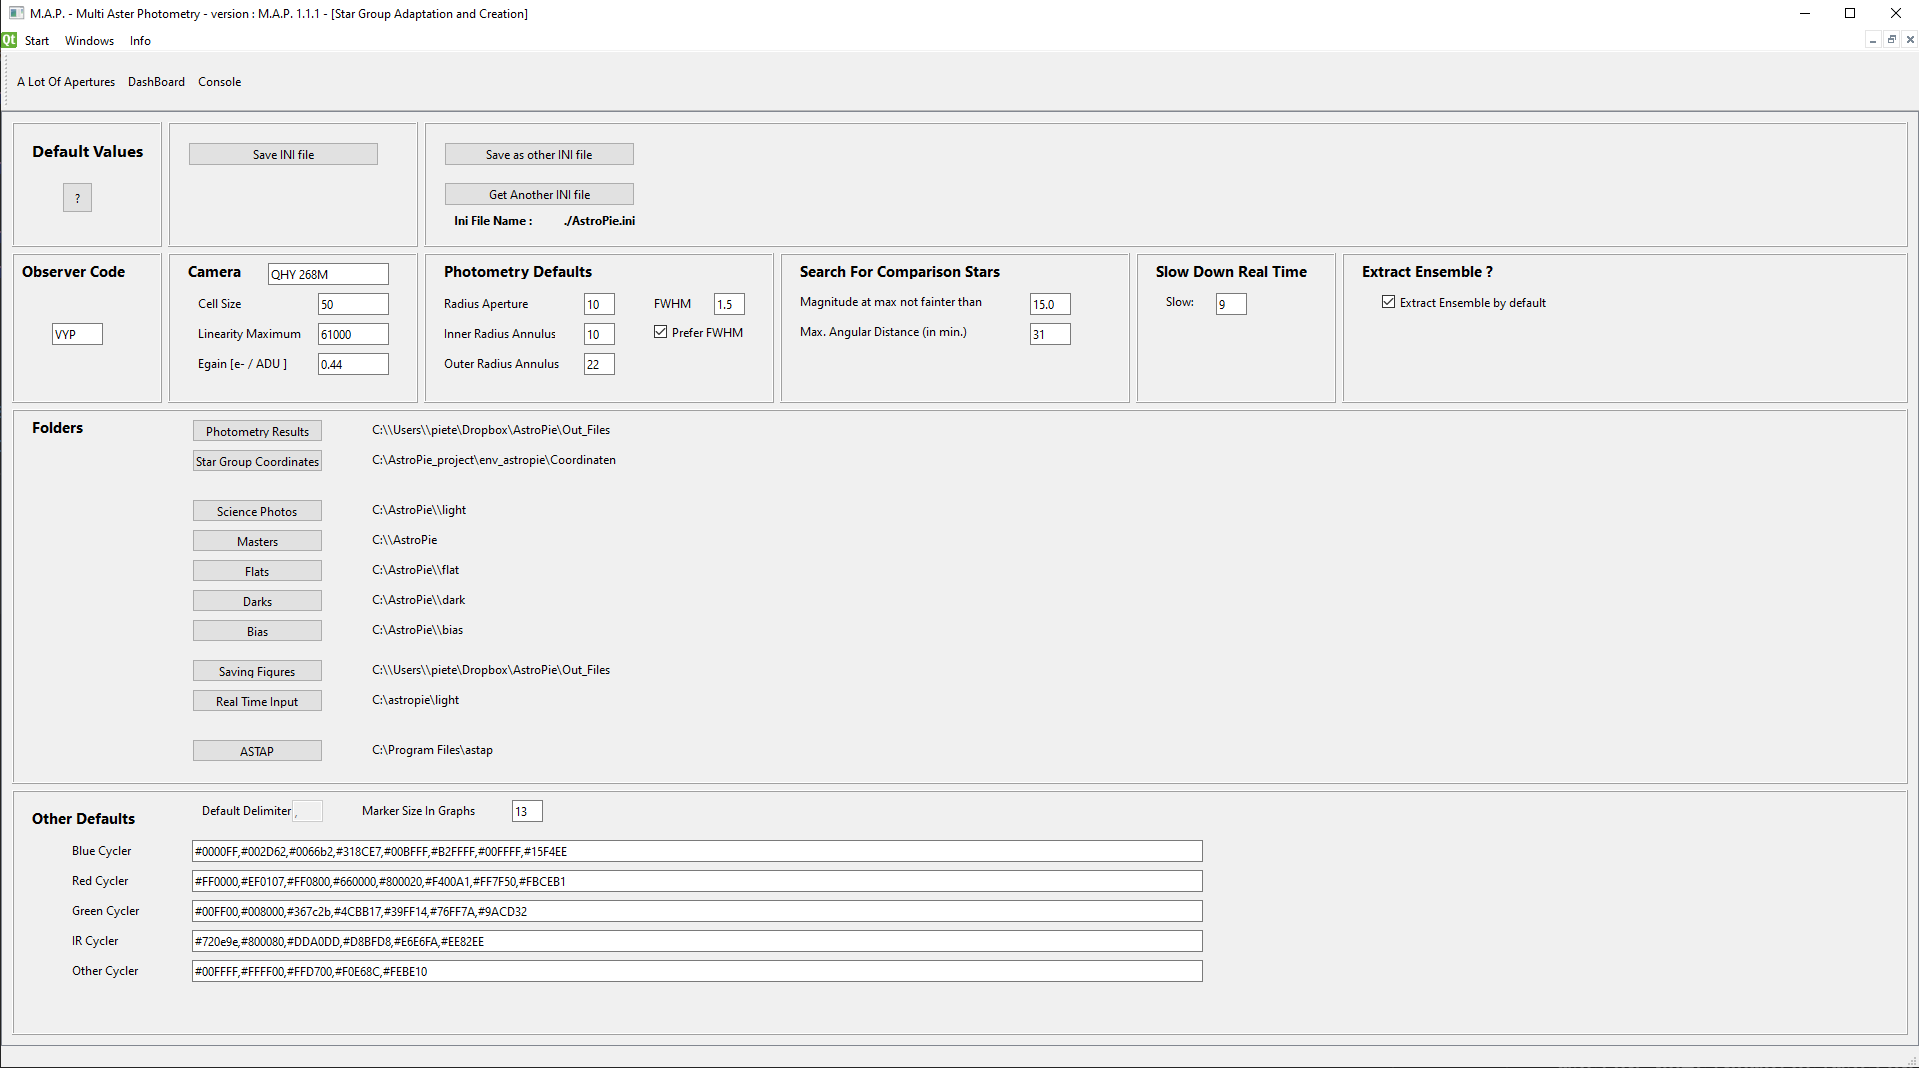
One can even additional setups by saving the values in another file, this can be interesting if you have more than one camera and telescope combination.

Danger : if a parameter points to a folder with a drive letter that does not exist, you'll get an error message asking to inspect astropie.ini
## Observer Code
observercode=VYP
The obsercode to use when creating extract files for the AAVSO.
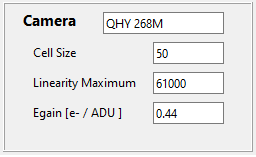
## Camera Related settings
Camera = an identification of your camera. Just for information.
Cellsize
Around each star a square is used to work on it, containing the aperature and the annulus around the star. It depends on your setup how big this cellsize should be. Do not take it too small, do not take it too big.
You can visualize this by using the ALotOfApertures screen.
Linearity Maximum
Until what value of ADU does your camera stay linear : the basic idea of photometry is that the respons of your sensor reacts linearly to the brughtness of your star. This is only valid until a certain level.
EGain
--> Egain of your camera in electrons per ADU (see the documentation of your camera)
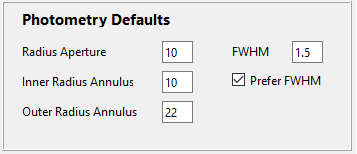
## Photometry details
Radius Aperture
--> Default Radius of the aperture (i.e. the circle over the star). If FWHM is used this value is not very important (except for extremely faint stars)
Remark that on the StarGroup screen the radius of any star can be changed
Remark that on the StarGroup screen the radius of any star can be changed
Remark : the radius should be chosen so that no other star is to be found in the aperture around the star
Inner Radius Annulus
--> inner radius of the annulus.
Remark that on the StarGroup screen the inner radius the annulus of any star can be changed
Outer Radius Annulus
--> outer radius of the annulus.
Remark that on the StarGroup screen the inner radius the annulus of any star can be changed
FWHM
FWHM_prefer
--> FWHM indicates how big your star is on your photo. The radius of the aperture in pixels around the star is then taken as 1.5 times the FWHM
This is to be prefered instead of using a fixed radius around a star for placing the aperture.
EXCEPT when the star is very faint (and the SNR thus very low). In that case rather use the technique with a fixed radius.
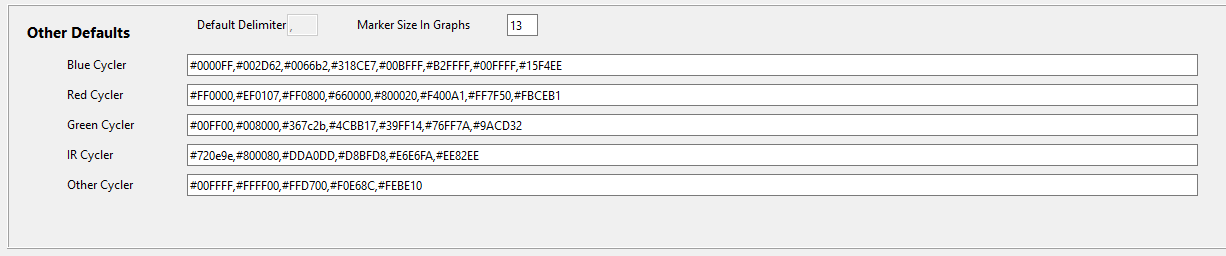
## Other Defaults
Magnitude at Max not founter than
When creating a star group ignore all stars fainter than this value. It's a default value and can be changed on the screen of the star group.
Maximum Angular Distance (in arc minutes)
When creating a Star Group, only take into account all stars closer than 30 minutes to the coordinates on the StarGroup screen
Slow
When doing Real Time photometry its best to wait some seconds after the photo has been created. This is a default value, on the Real Time screen it can be adapted.
ExtractDefaultEnsemble
If by default an extract for AAVSO should be done for an ensemble, or by Reference Star plus Check Star.

## Some folders used by the program
Photometry Results
--> folder where the extracts with the results are placed. I personally use a dropbox folder as one does not want to lose this file.
Star Group Coordinates
--> where to save the files with the data on the Star Groups.
Each Star Group has one file.
If a Star Group is not needed any more, you can remove it from this folder
Science Photos
--> base folder for your science photos.
Typically one will add subfolders per star and per star and date.
See help on Calibration and Science Frames
Masters
--> base folder for your master photos
Typically one will add subfolders per camera and per date
Dark Masters are placed in a separate folder.
See help on Calibration
Bias
--> base folder for your bias photos
See help on Calibration and Bias
Saving Figures
--> folder where the figures are saved. To save a figure you have to click on it.
Real Time Input
--> M.A.P. can do photometry on your science photos whilst you are making them. This is the base folder where the photos should arrive. Any time a photo is saved in this directory, the photometry is started.
ASTAP
-->folder where the ASTAP program is located

## More Defaults
Default Delimiter
The delimiter used in the extract files.
(not changeable for the moment)
Marker SIze in Graphs
--> Size of the points in the figures produced by M.A.P.
Cyclers
By default a graph is in the color of the filter of the science frames (this can be overruled in the Photometry screen).
As more than one star can be shown in a graph, some need of different shades of blue, red, ... are needed.
You certainly recognize the hex values of the colors !